WebToon Forge
AI-Powered Korean Webtoon Production Studio — Turn One Script into One Full Episode
Upload a few character images and a script. WebToon Forge breaks the story into scenes, designs panels, creates the artwork and places editable speech bubbles to complete a vertical-scroll webtoon. Export upload-ready files and a 60-second short-form video.
Production flow
Reference Images → Script → Scene Analysis → Webtoon Generation → Edit & Export
9:16 Mobile vertical-scroll format (1008×1792)
13 types Editable speech bubbles placed above the artwork
60 seconds A short-form episode summary with AI background music

Actual output · SHAIRA Episode 9, Page 1
Who Is It For? — You Only Need a Story
WebToon Forge is not simply a drawing tool. It is a production tool. You define the story and the appearance of the characters; AI handles the remaining workflow. Revise an unsatisfactory panel with a written instruction.
Writers & Storytellers
When the script is ready but there is no time for artwork
Panel breakdown, camera framing, lighting and sound effects are planned automatically. A complete episode can be produced within hours.
Channel Creators
When you also want to publish the webtoon as a short
Compress a finished episode into a 60-second vertical video with narration, character voices and background music.
First-time Users
When AI production tools feel unfamiliar
The interface follows four tabs: Reference Images → Script → Scene Analysis → Results Gallery. Work through them in order.
How to Use — Complete an Episode in Five Steps
Every screenshot below is from the actual application. The example follows “SHAIRA Episode 9 — Night on Hanbyeol Mountain” from start to finish.
STEP 1 Create a Project
On the first screen, click Create New Project and select a title and genre. Work is saved by episode, and you can resume from a project card at any time.
• Each card shows progress, such as 2/2 pages · 100%.
• The Save button stores images, scripts and speech bubbles together.
Note Projects are stored in the browser currently in use. They do not automatically appear on another PC or browser.

Home screen · Saved episodes are displayed as project cards
STEP 1 · Continued Choose a title and genre
Choose from twelve genres including fantasy, romance, action, school life and horror. The genre later guides dialogue tone and image style.

New Project · Enter a title and choose a genre
STEP 2 Register Reference Images
Upload character artwork and enter each name. The same face, hair and costume are maintained throughout the episode. Backgrounds, costumes and props can be registered in the same way.
• Set an asset as a Fixed Character and choose Main, Supporting or Minor so the AI can identify it more accurately.
• Names such as Harin_SchoolUniform let you register several outfits for the same character.
• Use Import from Another Project to reuse characters from previous episodes.

Reference Images · Two character sheets registered, with Harin as the lead and Seoha as a supporting character
STEP 3 Enter the Script
Paste the complete script. Using the panel format below helps the system place the correct location, characters and dialogue in each shot. Word-processor documents can be imported directly.
C01. 2-TIER | LOW
[CAST] CH_HARIN, CH_SEOHA | [BG] BG_MOUNTAIN_TRAIL | [PROP] Flashlight
A foggy trail on Hanbyeol Mountain. Harin and Seoha climb with a single flashlight.
SEOHA: “Are you sure this is the right way? I keep seeing the same tree.”
HARIN: “According to the map, yes. The clearing should be just ahead.”
• Set the number of pages and panels per page, such as two pages × three panels.
• Choose the dialogue tone and image style.

Script Input · Six panels, two pages × three panels, modern conversational tone
STEP 4 Scene Analysis — AI Plans the Storyboard
Click Start Scene Analysis. The system reads the script and organizes location, cast, time, camera framing, emotion and sound effects for each panel. This becomes the blueprint for image generation.
• Correct an incorrect location or character with Edit Location & Cast.
• Choose Standard, High or Highest image quality and additional options on the right.
• Costumes from a previous episode can continue automatically in the same location.

Scene Analysis · Panel 2 “suspicion · observation · close-up,” Panel 3 “surprise · tap!”
STEP 5 Generate the Webtoon
Click Start Webtoon Generation and pages are produced in order. A page usually takes 30–60 seconds. If generation is stopped, completed pages remain available.
• Registered character sheets are included in each generation so faces remain consistent.
• Speech bubbles are placed as editable overlays instead of being permanently drawn into the image.

Generating · 0 of 2 pages complete. Stopping the process preserves completed pages.
STEP 5 · Results Completed Pages
Completed pages appear with speech bubbles and sound effects. Regenerate only the page you dislike, revise a selected area with the editing tools, or download the entire episode as a ZIP.
• The speech-bubble counter on each page card shows how many overlays are present.
• Five-part quality validation checks face consistency, composition, dialogue placement and other quality factors.

Results Gallery · Two pages complete with editable speech bubbles
After Generation — Revise a Panel with Words
You do not need to redraw the entire page. Select the area and write an instruction such as “make the expression sad” or “remove this character.” Only the requested area changes.
6 Edit — AI Image Revision
Click Edit on a page. The artwork opens on the left and editing tools on the right. Choose Character, Background, Effect, Mood or Margin and describe the change.
Area selection: Draw a box over the image. Characters and props intersecting the box are revised while the background remains.
Reference image: Attach a registered character sheet or another panel and write an instruction such as “use this face” or “use this pose.”
Quick instructions: Frequently used changes for expression, clothing, hair and pose are available as buttons.

AI Revision · Area Selection ON · Revise selected objects only while preserving the background
7 Edit — Speech Bubbles & Sound Effects
Speech bubbles remain separate from the artwork, so their text, position, shape and visibility can be changed without altering the image. Thirteen types are available, including regular, thought, whisper, shout, scream, anger, fear, phone and off-screen.
• Even if a bubble is removed from the webtoon page, its dialogue can remain as a voice in the short-form video.
• Sound effects such as “Whoosh!” and “Tap!” are placed in the same way and support selectable fonts.
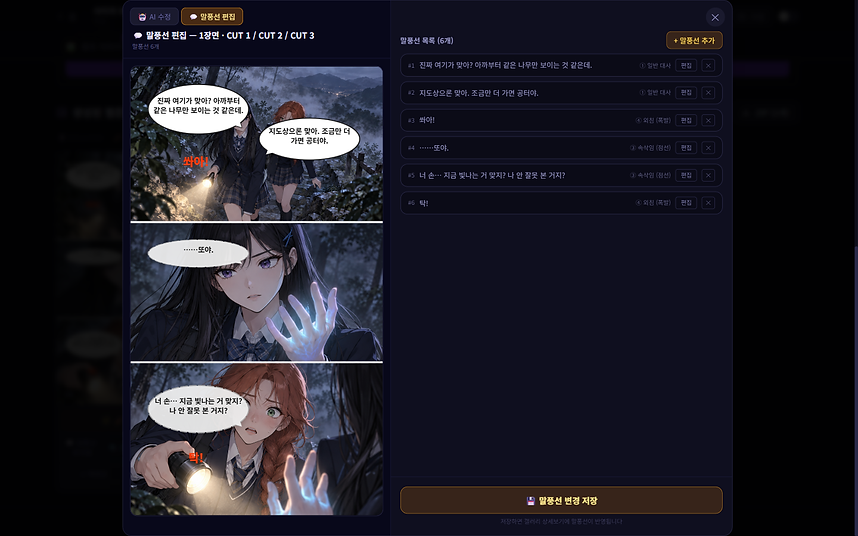
Speech Bubble Editor · Six bubbles using regular dialogue, whisper and shout types
8 Upload Preparation — Creator Notes & Comments
The system reads the episode and drafts a one-line creator note and a creator comment in emotional, humorous, teaser, serious or conversational styles. It also suggests likely reader comments.
• Choose the tone you like and copy it directly.

Creator Note · “In the darkness, the glowing palm reveals the fear hidden inside.”
9 Complete — Export the Episode
Export Episode downloads a ZIP containing the pages in order. Open index.html inside the package to review the episode as a vertical-scroll webtoon. Missing and duplicate pages are checked automatically before export.
Episode packaging complete — QA: PASS · 2 pages · 0 duplicate groups · 0 missing numbers
Files ZIP (Page PNGs)
Finished page images with speech bubbles and sound effects for platform upload.
Preview index.html Viewer
Open in a browser and review the complete vertical-scroll episode.
Turn One Episode into a Video — 60 Seconds with Music
Create a vertical 1080×1920 video from the completed episode. Panels appear in sequence with slow camera movement, while a narrator and character voices read the dialogue. No separate video editor is required.
10 Short-form — Create a Vertical Video
Click Create Short → Auto-generate Shots to turn the episode into a shot list. Edit duration, framing, camera movement and transitions for each shot, and drag to reorder them.
• Chronological mode follows the panels in order. Condensed mode opens with a decisive scene, rewinds and ends immediately before the climax.
• Narration can use Harin’s voice while each character uses an individual dialogue voice.
• Panel animation adds subtle movement such as blinking eyes and moving hair.

Short-form Editor · Five shots · 20.5 seconds · Two narration lines
11 Short-form — AI Background Music (Suno)
AI Composition reads the story and emotional timeline, then plans an introduction, rising tension, climax and abrupt ending. Two music candidates are generated for review.
• Track duration automatically matches the video.
• Music volume is automatically reduced while dialogue plays.
• Choose My File to use your own music.

AI Background Music · “A mysterious atmosphere with rising tension” · Five-part structure
12 Short-form — Import External Webtoon Pages
Drop several vertical webtoon pages created elsewhere into the application. WebToon Forge automatically separates them into panels. Dialogue and emotion data from scene analysis are assigned to the panels in sequence.
• Files are sorted numerically and can be reordered with ▲ and ▼.
• Providing the number of panels per page helps identify caption boxes and thin dividers accurately.

External Pages · Example: 690×6735, ten panels per page × nine pages = ninety panels
Before You Start — Requirements and Notes
Requirements — One computer and API keys
• On Windows, double-click start.bat and open localhost:3000 in Chrome or Edge.
• OpenAI is required for analysis and images. ElevenLabs is used for voices, Suno for music and Google Gemini for panel animation. Features without a key remain disabled.
• Mock mode lets you practice the entire workflow without generation costs.
Cost awareness
• OpenAI image generation is charged per request. Use Standard quality for drafts and regenerate only final pages at high quality.
• Suno uses credits and normally returns two tracks for each request.
• Partial AI revision also incurs a charge, so use area selection to revise only the necessary region.
Storage
• Projects are stored in the current browser. Copying the program folder alone does not move browser-stored episodes.
• Export completed episodes as ZIP packages for permanent backup.
More documentation
• The Manual button on the home screen contains twelve chapters covering formatting, revision tips and troubleshooting.
• See SCENARIO_FORMAT.md for panel formatting and SHORTS_GUIDELINES.md for short-form specifications.

User Manual · From setup through troubleshooting
Reference Images → Script → Scene Analysis → Generation
Follow this order to complete an episode.
WebToon Forge · Korean vertical-scroll webtoon generation powered by GPT Image · Replication of a specific artist’s style is prohibited